Showing posts with label penpals. Show all posts

Saturday, December 29, 2018

How Does Your Creative Process Work?

My Journey  Exploring the Creative Process


I have decided that I want to work on my (lack of )  watercolor skills!  I thought simple projects would fit the bill....and so the humble postcard it is.   I mainly get my ideas for watercolors from what's around me...or good ol' Pinterest!  Until I learn the techniques...I will need to study other works and then go from there.


These are my favorite from the last bunch that I did.  I did spray them with a water color sealer. Warning:  It takes a few weeks before the odor evaporates,  These were painted on Cotton Arches and credit goes to Pinterest.


I'm trying not to waste my watercolor paper and so I "practice up" first.  My first attempt at the study  is in my  mixed-media sketchbook.  After sketching the picture,  I work on painting it.


I do another run of the same painting in my Traveler's notebook.  


Haha...I make mistakes everywhere!   Seems I don't know how to spell "December"!
But, three attempts is not always a charm!  My post cards of my winter catus...turned out to be quite disappointing.  I totally forgot what perspective I was working on...haha!   I even  tried covering up my mistake with a label!  It's all good...I send them to my twin sister and ya know what?  She doesn't care!!! ;-)


I thought I would share with you some of the books that I find helpful for learning to sketch and watercolor techniques.  This book is definitely a keeper!  You won't waste a cent on this book.  It's also a great primer on plein air painting as well.  I am not in the practice of carrying around a sketchbook, or doing a "sketch-a-day" but I would love to start getting into that habit. What about you?  Do you add watercolor or other medium to your snailmail?  

A Sketch A Day
Will Keep
Mistakes
Away!

Pam 


Friday, August 18, 2017

See Inside My Mail...Literally!


More Outgoing!


Here is some Velum mail going out to a super creative new friend.  I hope she liked it, she sends me amazing mail...


I love sending out retro mail.  Here is a recent one with some vintage postage.


I found this Royal Post decor at my JoAnn's at the beginning of the summer and couldn't resist.  I attached it to my front door wreath, and I think it looks right at home on my 1920's Virginia farmhouse, what do you think?

Happy Snail Mailing,
Pam

*Available In The Shop*


Monday, May 30, 2016

Pocket Sized Flip Books


I did a couple smaller flip books recently, and they were pretty similar that I thought that I would group them together in a single post. The lighting in some of the photo's is awful, so I will apologize now! I don't really have many comments to make, so I'll just let the photos do the work.  Enjoy!


 I enjoyed passing on some vintage post cards that I had!


Here is another cool vintage postcard  of a cathedral.  


Birds and eggs...


Happy Snail Mailing

Pam

Tuesday, November 3, 2015

Autumm Snail Mail...Oh the Letters That Fly!


Like Falling Leaves


This is a scene looking into our back pasture.  The colors are beautiful, I love it when the setting sun seems to be kissing the tips of the trees, and autumn seems to be in all of her splendor.  Don't you think that this time of the year is a great time to send out some snail mail?


Here is my "autumn snail mail stash"!  This is a fun time of year to use up these autumn goodies, so let's get inspired and send some out!


You can use some craft envelopes--they look like they belong to the autumn theme, don't they? Pumpkin spiced tea?  How about some cute journal cards, apple die cuts,  falling leaves, and pages out of an old book?


Even "sew mail"  look like it belongs to the autumn theme...chai tea, with those cinnamon sticks, more falling leaves, pumpkins, pumpkins,everywhere!


I've been on the hunt for some autumn  washi tape. I really didn't have much in the autumn theme.  The top two rolls were from Target.


These washi tapes are more of the muted tones.  Pretty, aren't they?  I think that I got ALL of these online through Etsy.


These outgoing letters are pretty basic, but I like them because they have a cute little fox curled up in the corner.


So grab a package of stickers, and maybe some tape...and do you have an orange gel pen? All of these things add a little bit of sparkle and fun to your letter writing. Letter Writing should be relaxing and enjoyable for you, and special for the person receiving it.  You can do it!

The craftier the better,
Happy Snailmailing!

Pam


Friday, October 30, 2015

Elvis Was Here Snail Mail

A Little Elvis Fun 


When these stamps came out earlier this year, I knew I HAD TO HAVE THEM!  You see, I have a family connection to Elvis through my grandmother.  My grandmother actually got to meet Elvis in a flower shop that she was managing on a Christmas Eve.  The story is BIG in our family history.  But I like the presentation of these stamps as well...black , white, and gold... totally speaks "Classy" to me.
I like to base quite a bit of my mail art on my stamps and this stamp is no exception.


I grabbed my black envelope/card set,  white calligraphy ink, black and white washi tapes, stickers, and got to work.  This is what I came up with.


An Instagram "buddy" of mine introduced me to Dr. Ph Martin's Pen White ink for calligraphy.  This is the second white ink I have tried.  The first ink was too watery and translucent.  I wanted a more opaque ink, and one that sat on top of the paper.  At one point I had to add a drop of water to the ink because it started to become too thick.  I don't know all of the technical terms that ink reviewers use when doing their thing...that is the best that I can do for you!  But if you do use this ink, don't be in a hurry.  It takes several hours (overnight?) to dry completely.  You will see on my envelope that I have a few smudges and splatters.  I'm not the best one to take my own medicine.


 The ink writes very smoothly, I appreciated that.  The nib I am using is a new Brause nib, which also worked nicely.


Here is a bit closer shot of the card with dimensional sticker, a home made black tag, and envelope.  All together, I think it turned out some what classy, minus the smudges and splatters.


Ah.  Let us take a closer look at these smudges and splatters!  I thought the use of the sticker in the return address area gave it an area of interest.  Over all, it was a fun Elvis project that I think my sister will enjoy.  It gave me an opportunity to try out this ink, and now I am anxious to use it some more!

Let me know what you have been doing in your snail mail corner!

The craftier the better,
Happy Snail Mailing,

Pam

Monday, September 21, 2015

Have Mail, Will Travel!

Mail Art On The GO!


I received this most delightful package from my twin sister for my birthday some time back.  Of course it was immediately LOVED.


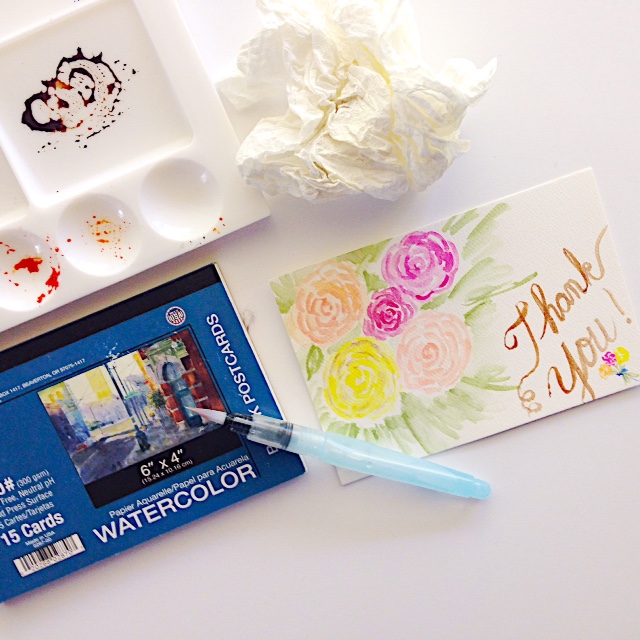
Have you ever used an aqua brush?  I had not.  But I quickly discovered it's amazing feature of its "portability".  It TRAVELS well!  You see, the shaft screws on and off and hold the water.  This eliminates the need for a bowl of water to clean your brush so all you really need it a bit of paper towel.   I took this set of brushes with me to camp in the mountains this summer, it also went with me on a trip to  the Potomac River.  I now include them in my portable writing box along with a baggie of paint tubes.  


Here was the Thank You postcard I mailed to her.  What did I send her for her birthday?  Agggrrrrrhhhhhh!  I still haven't sent her anything.  UGH!!!  She totally stumps me.  I just don't know WHAT to get her, any ideas?


The Craftier the better!
Happy Snailmailing,

Pam


Friday, September 18, 2015

I Spy A Stamp!


Do You?

My daughter and I were recently in a craft store.  She wanted to buy some scrapbooking paper, and I was busy elsewhere.  She found this paper and immediately knew that I would love it.  And I did.


Unfortunately, it was a rather small piece of scrap booking paper.  I guess 8 1/2 X 11.  Too small to make envelopes.  Boo.


The next best thing that I could come up with was to just cover the front of a purchased envelope.  I was able to get two and have some scraps left over.  Don't ever throw away scraps!


Haha.  Do you spy the "real" stamp?


The Craftier, the Better--
Happy Snail Mailing

Pam


Wednesday, September 9, 2015

Confetti Mail


Do you want to add a bit of color splash to your letters?  Here is an inexpensive, frugal  way that gets the job done.


This confetti has the colors of summer...ah, fading summer.  But we can keep it alive with our snail mail colors.  Summer never dies, it just fades away.


The Craftier, the better.
Happy Snail Mailing

Pam


Friday, June 12, 2015

Cutest Little Post Office...EVER!!!

I Die!!  (For all the cuteness!)


I was heading home from a Ladies Bible Conference in the Blue Ridge Mountains when I passed by this adorable  Post Office in Redwood , VA !  I was so disappointed that it was closed...but it was late in the afternoon on a Saturday.  I would have definitely gone in had it been opened. Oh...if  I were a resident of Redwood...I would put up window boxes  with gorgeous flowers...wouldn't that complete the picture?

Have you ever heard of the Post Office Project?


You can read about this project and why the  owner of this site began photographing post offices and archiving them.  Is your post office  in peril of being closed?  Unfortunately,we live in a fast paced world and the routine closing of post offices are a fact of life .

I do sincerely hope that the township of Redwood, VA does not plan on closing this little jewel.  


Save Our Post Offices....
Write Letters,
Write Often!

Lady Pamela


Monday, June 8, 2015

Instagram Give Away!


Hey everyone!  Head on over to my Instagram Feed for this Give Away!  There are  a couple "Smash" items  --date, item stamp, large background vintage rubber stamp, Some Target One Spot items, and cute little umbrella /rain  stationery set.  Look for my original post and follow the rules!  Winner will be selected on Wednesday!  Best Wishes to EVERYONE!!

Instagram Feed:  lostart_revived

Write Letter,
Write often!

Lady Pamela

Wednesday, May 27, 2015

Let Me Tell You About A Letter In My Mailbox...Addy Mail!


A "Letter" from Addy is really a Parcel!


Addy is one of my instagram "buddies".  She is such a sweet young lady, and hugely crafty with her mail projects.  Here is her most recent "letter" to me.  You can see from the photos below that with each pocket and crevice, she has it stuffed with all sorts of goodies. It takes quite sometime to go through all of the goodness, so you see why I call it a Parcel/Letter!


Pretties, pretties, pretties!


Don't you just love the color scheme going on here?  It is just shouting out to me:  Sunshine , girl!


These little pull behind campers are so nostalgic that they have quickly become iconic!  Look at all the details that she had to cut out by hand!


Here is all the goodness stuffed into this  sweet letter.  And yes, the letter is always the highlight for me....but don't get me wrong.  I love goodies like the next person does.  

Addy mail always brightens up my week!

Write Letters.
Write Often.

Lady Pamela

Wednesday, May 13, 2015

Snailmail and Water Colored Envelopes

I got inspired by some art on Pinterest...

I love watercolors.  I want to be able to spend more time on this pursuit.   Here is how I am teaching myself with the help of pinterest artists.


Pinterest is my "go-to" place for water color inspiration!  My method is a simple, tried and true process  used through the ages for instructing artists.  Simply put:  Imitate other works (with credit to the artist, of course!).  I have found  wonderful watercolor artists that have pinned their works , so that is my starting place.  I also try to  watch video  tutorials when I can.    I absolutely love  Cindy at Yapping Cat  Studio's ( yappingcatstudio)  style.   I love how she letters her words with a brush, and her folksy feel.    This  envelope was on her website ....I just had to try it.  It encouraged me to think of original designs for future projects.  I like the splash of color  with this basic monochrome scheme.    She is so talented.    I hope you will visit her site, maybe you too will be inspired.

When I  contacted Cindy of yappingcatstudio to get her permission to post this copy of her work  gave me the history of the original envelope.:  
     

     I had wanted to send a thank you to a friend and wanted the envelope to be really pretty.  I had       taken several photos of her home, her yard etc.  Blue is her favorite color, the cat's  name is Jasper (just one of her 3 orange tabbies) and the flowers were in her yard.  

Wow.  How about  THAT for customizing an envelope????

Cindy was really sweet and encouraging of my watercolor endeavor. I plan on sending this to my sister who is also interested in watercolor.  We are trying to keep each other inspired!  How about you?  Have you been trying anything new in the creative realm?  


Write Letters,
Write Often.

Lady Pamela


Friday, May 1, 2015

Lydia Mail...

A Tri-fold Pocket Letter

This is my Tri-Fold Pocket letter, that is more like a wallet.  It is made from a 12X12 piece of scrap book paper that  you fold up from the bottom to make the pockets.  Washi tape is used to  made the pocket divisions.


This is my Tri-Fold Pocket Letter, that is more like a wallet.  It is made from a 12 X 12 piece of scrap booking paper that is folded up from the bottom to make the pockets.  Washi tape is used to make the pocket divisions.


But first things first.  The Letter.  This is to my daughter Lydia who lives several states away.  For her letter I decided to use graph paper for a change up.  She is my theater major, so I went ahead and illustrated the letter a bit, for extra flare.  


After the letter I started scrounging around for my green, orange, red, and pink items to include in the pockets.  After everything was arranged...


I took a piece of my Dollar Tree Frugal find, Ribbon, and tied it all together.


The flower you see in the left pocket,  was made by using this tear drop punch.  I glued the pieces (large ones underneath, smaller ones on top) and glued to a 3/4 inch circle  made with my punch.  I put a hole in the center and used a tiny brad in the middle.  You can use a pencil to curl the flower petals so they appear to be 3-D. 


I know.  This is a repeat of photo # 1. I'm sorry that  I don't have a picture of it in the envelope.  But let me tell you what I did.  I purchased some lip and tuck clear  cello bags off of Etsy and used it to be my envelope.  I placed about 5 stamps on it because it  had to go parcel rate.   I used a label for her address.  It was fun using the clear cello bag for mailing.    I am also using this method quite a bit for my Bi- Fold Pocket Letters.  Yay!  The best part is...it arrived safe and sound and my daughter found it on her pillow when she got home from an exhausting day...(thank you mom/Grandma!).  She said it was just what she needed at the end of her day.

Write Letters,
Write Often!

Lady Pamela