Showing posts with label sistamail. Show all posts

Monday, September 21, 2015

Have Mail, Will Travel!

Mail Art On The GO!


I received this most delightful package from my twin sister for my birthday some time back.  Of course it was immediately LOVED.


Have you ever used an aqua brush?  I had not.  But I quickly discovered it's amazing feature of its "portability".  It TRAVELS well!  You see, the shaft screws on and off and hold the water.  This eliminates the need for a bowl of water to clean your brush so all you really need it a bit of paper towel.   I took this set of brushes with me to camp in the mountains this summer, it also went with me on a trip to  the Potomac River.  I now include them in my portable writing box along with a baggie of paint tubes.  


Here was the Thank You postcard I mailed to her.  What did I send her for her birthday?  Agggrrrrrhhhhhh!  I still haven't sent her anything.  UGH!!!  She totally stumps me.  I just don't know WHAT to get her, any ideas?


The Craftier the better!
Happy Snailmailing,

Pam


Thursday, April 16, 2015

Send a Party In A Box !!

Happy Mail...Literally!


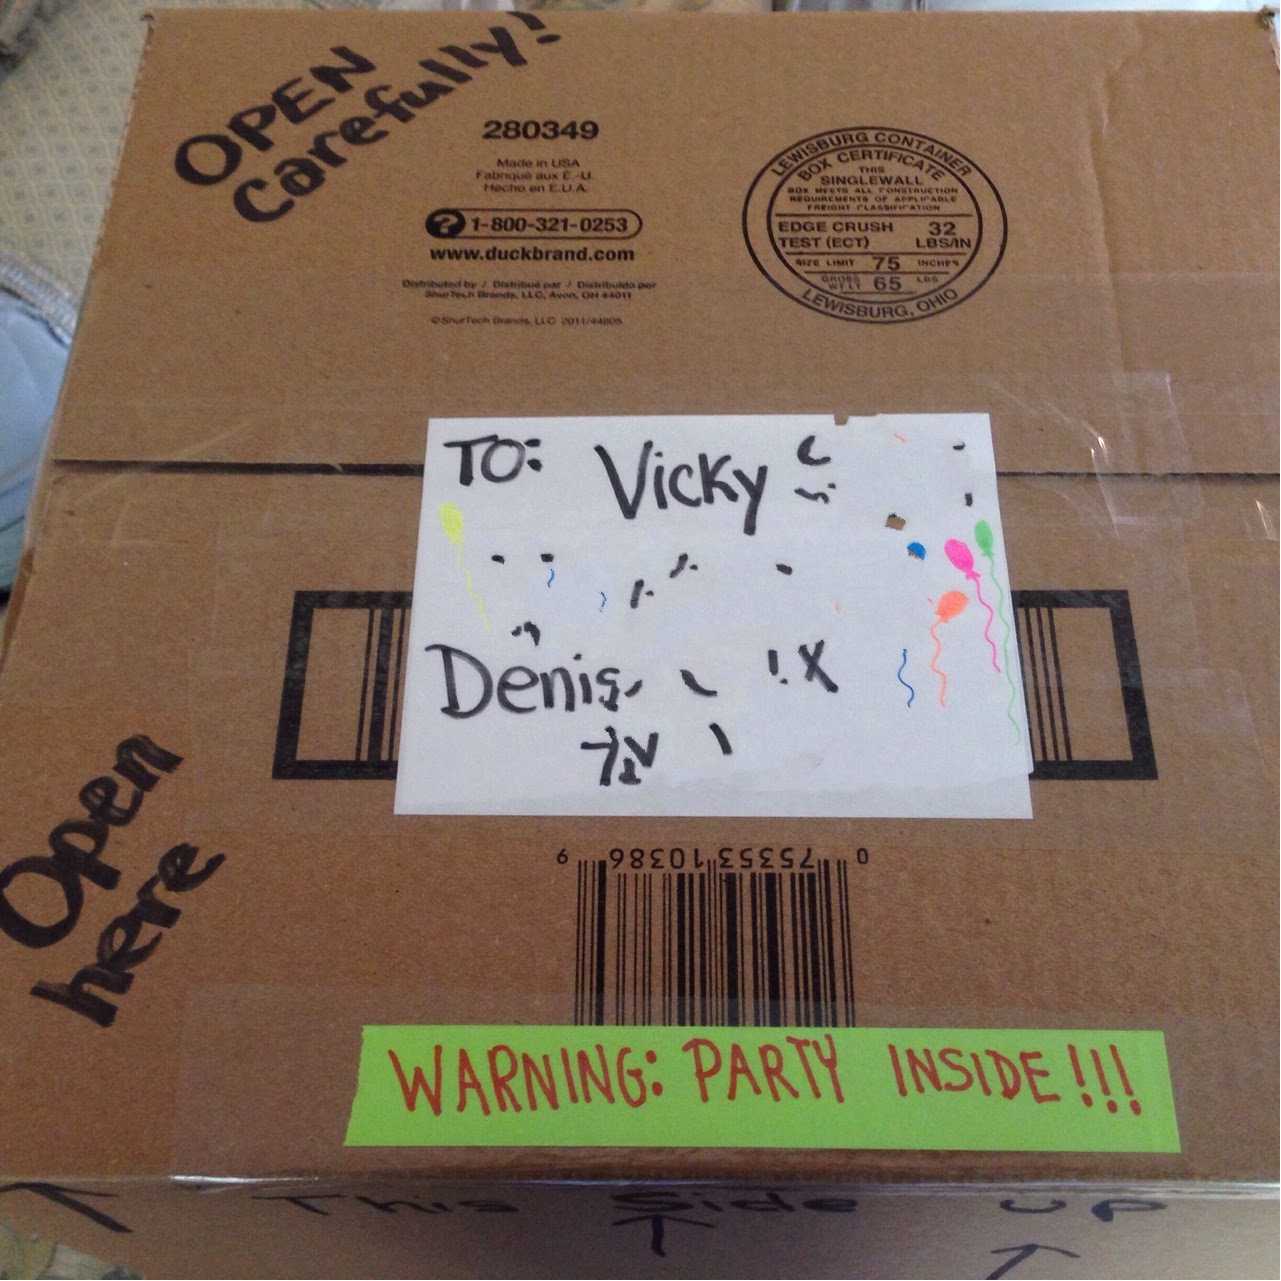
OK.  Are we ready to get the "Party On" ??  I have a sister who lives quite a distance from me...oh, say...2,100 miles?    I am sorry to have to say, I was not able to attend her birthday.  However, in our family, we have the tradition of extending the days of our celebration.  I had already sent her one parcel earlier this week.  Now for the next one.

First, the box.  This is a 14 X 14 X 14.   You are going to need a roomy box for this "party!"  I went ahead and wrapped the various gifts I had for her and put them in the bottom of the box.  I think that wrapping them in different papers just adds to the excitement.  So, don't skimp here.  Did you know that you can get a really fantastic selection of wrapping papers at Tuesday Morning?


Next goes in the crepe paper.  I had tons of colors left over from a "Rainbow"themed party for my little girl.  I just cut off about 1 ft. strips  of it and dumped it in over the gifts.


Next, come the balloons.  I didn't blow them all of the way up, as I wanted to included as many as I could and with all of the colors, so they are rather on the small side.


I threw in a few party hats...I had lots of different colors of these as well.  Then I just sort of "mixed it all up" with my hands to distribute the balloons, crepe paper and hats.


Next came the gel pens to do a bit of writing on each of the flaps.


Yep!  So true, so true!


I know you can't believe it.  I didn't include a letter.  This little note on the flap was I all included.  Haha...my two sisters are not letter writers, I might get a letter out of them  every once in a great while....sniff, sniff.  Poor me!   But, aside from that, I was in a hurry and just needed to get this project done, so the note on the flap would have to do!


I left the exterior of the box rather plain...with just the  little "warning"!!

I'll let you all know what her response to it was when she gets it!  So there you have it...YOU can send a "Party in a Box" too.   TIPS:  Try to keep the weight down...be careful about the over all weight.   A box of   these dimensions...the heavier it is...the more the $$$$$$.  This one wasn't too bad,  it was only 4.5 pounds, total. The nice thing about  balloons and crepe paper is that it doesn't really add anything to the weight of your box.    Just be careful and watch the weight.


Make someone feel loved, special , and of course, HAPPY today !

Write Letters (or notes on box flaps)
Write Often.

Lady Pamela  
(Saving USPS jobs...one letter at a time...one parcel at a time!)

Monday, November 10, 2014

DIY: Send a Rose...Postally

Last Rose of Summer  Project
2014


I have saved this extraordinary sturdy, pretty, little box for quite some time...probably about 3 years...always intending to use it for a particular project. The project is called the "Last Rose of Summer".Thankfully, I  finally did get around to it!  I had received a beautiful rose once in the mail from  a young pen pal.  The rose was in full, gorgeous bloom when it arrived. This is from where I derived my inspiration for this postal experiment.


I knew I needed to act fast, as winter winds were starting to blow...I have been eying my neglected rose garden for a couple of weeks.  The rose bushes were looking pretty sad, and spindly, but still producing a few blooms.  The instructions I gathered from the web stated  to select only closed blooms to mail.  I found a few tight buds and this one that was about 50% opened.  I decided to give it a try.


You will need a water pick (from a florist) or do what I did and get some plastic wrap, paper towels and some packing material.  I used tissue paper.


I had to cut the stems rather short as the box is not very tall.


Next, you need to wet the paper towel, but not sopping wet. After this, wrap the paper towel with plastic wrap and then secure with a  rubber band.


I wanted to add some type of a tag to it, since I wasn't including a letter  (I was in such a hurry).  This is going to my older sister, one of my heroes!  


Pretty!


You can see that the bunch is a bit too tall for this box, but stems are flexible, so I just curved them down into the box...

made everything snug with a bit more tissue paper...


then wrapped the box up, labeled it , tied it with a string...and off it went.


Important Tips to remember if you send a "Last Rose Of Summer" to a loved one:
  • Pick your rose before it has bloomed.  Tight buds, or just partially bloomed is best.
  • Pick your rose in the morning and mail in the morning if possible.
  • I made the mistake of mailing it today...tomorrow is a postal holiday, so it won't reach my sister for 3 days more!  Think ahead, and try not to mail around postal holidays.
Write Letters. (or in this case: Send Parcels!)
Write Often.

Lady Pamela


UPDATE:

My sister, in Texas, texted me a photo today of the Postal Rose which she received today...just 2 days after I mailed it (in the late afternoon!) .  Can we say "YAY! FOR THE USPS?????  She said it arrived in beautiful condition, although the box was a bit wet.  


It is indeed beautiful.  So if you are not under a foot of snow...go out and harvest a rose or two... and Join me in the "Last Rose of Summer" Project 2014 !

Friday, November 7, 2014

Messages in Bottles... DIY Bottle Mail


Letters in bottles.... 
Twin  Adventures....
DIY Messages in Bottles


As 12 year old girls...we just knew our messages would reach some distant shore...we would receive a letter in some foreign, tongue, necessitating a  trip to some exotic foreign embassy to have  it translated...oh the romance of letters being  cast upon the unknown deep of the mysterious Pacific ocean!

Yes.  Hold on to your seats, it really is another Twin Adventure from the Twins Forever book...documenting  all of those special events.   This is one of them.  We really did hoist over our corked wine bottles, into the churning waters of the Pacific Ocean  ,  along with the enclosed notes  imploring the recipients to  reciprocate .  Time passed...lots of it.  But there  was never a response....sniff, sniff.
Where did these twins get their corked wine bottles?  I will now  turn to page 64 of the Twins Forever Book.... (not a primary source, more like a copy, of a copy, of a copy...)


There we are, the twins flanking our beautiful, ever stylish and patient mother.  We are on the SS George Washington .  This was day one or two of our cruise...and we are enjoying our  flotation drill We were on the ship for 2 weeks from Yokohama , Japan to Sunny California.  

My  twin sister and I,  immediately went to work on our "Messages in bottles" project. For  days, we staked out  the lounges, begging for empty wine bottles to have for our "messages in bottles " project.  Our acquaintances acquiesced, and we got our bottles,complete with corks.  I don't remember how many we threw overboard, but we had a ball doing so . Just a note to interject here, today it is not PC to throw bottles overboard...as it may kill wild life.   But instead, why not throw a bottled message into the sea of the USPS? 


So let's begin with our DIY tutorial for "Messages in Bottles"!

I am all about using the most frugal tools.  These were purchased at JoAnns.  The bottles are plastic.  The Corks, (I had my fingers crossed on this one) fit perfectly!


I cut a small piece of stationery in half,  for it to fit inside the bottle.


Wrote my "sista" mail...dredging up up old memories for her to enjoy...


Next, using a pencil or something of that nature, coil  your papers around to make it tight and snug.

My intention was to tie it with twine.

I had to use a bit of washi tape to hold the paper in place so that it remained tightly rolled, then tied it with a small piece of twine.


I then corked the bottle and put an address label on it.  Technically, it was ready to go...just needs some postage.But if you are not a minimalist, you might want to get out your stash of  tiny things and brighten up your bottle...

I am not a minimalist..more is always better!


After completing the project...I decided that the bottle might be a bit too small to cast "as is" into the sea of USPS...so I decided to take an extra precaution, and not to try the patience of the ever gracious USPS... I went ahead and placed the bottle into a large clear envelope.  Did you know that there is a "Message in a Bottle Society"?   There really is.  I just formed one--care to join?


Bring back enchanting, old memories! Go ahead and write a letter and send it in a bottle!

Write Letters,
Write Often.

Lady Pamela

Saturday, July 5, 2014

Sending some Auntie Mail and other Out-Going Mail!


Out Going Auntie Mail... Sista Mail


Here is some Auntie Love going out to my niece in Texas!  She needs a bit of cheering up.  The postal clerk was concerned about this package "making it" as is.   I thought I would go ahead and try it and see how it does.  Has anyone had trouble with these cello bags not "making it"?


Back View.


Cello bags...


I'm just going to keep me  my fingers crossed.  I'll let you know the verdict when I find out its fate.

Update:  Yes, this arrived safe and sound...without any "envelope".  I sent it through as is and my niece really enjoyed it. 


Here I am sending a bit of  "Sister Love"... a belated birthday present. Unfortunately this package met with the mishap of falling into the hands of a "By-the-rules" postal clerk , who happened to be standing next to the Post Master...who grabbed his  magic marker and started crossing through all of my notations.  He assured me though that, "all of the cool stuff is still there!"  Really?   Oh well.

 It never hurts to send some real "good news"!

What sort of July 4th mail did you send out?   I thought the Chinese fire cracker stamps were appropriate enough!


I had a few more added to this group going out, but they didn't make it into the picture.


I just  recently got back from our 3rd annual Chick Trip...this time to South Padre.  When you go  on vacation, don't forget to pick up your touristy post cards and maps of the area.  


Map envelopes are always fun.  A nice reminder of a pleasant trip.

Write letters.
Write often.

Lady Pamela